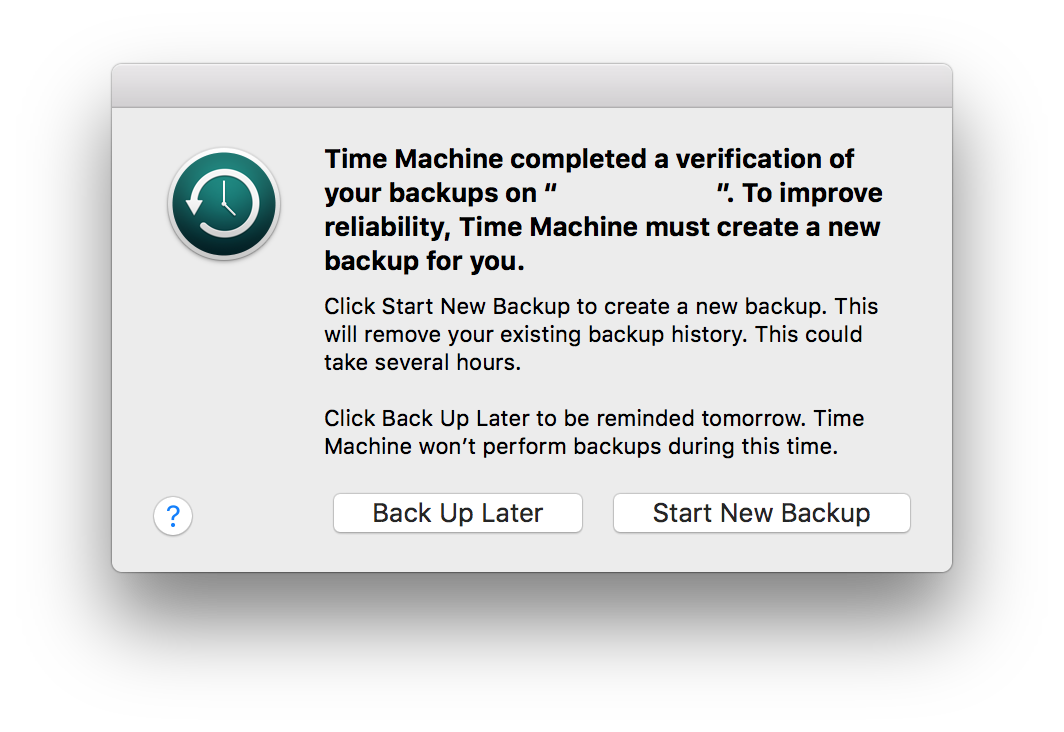
Yesterday my MacBook Air decided that it no longer trusted my Time Machine backup and wanted to create a new one. Apart from the time this would take (20gb over WiFi) and the fact that I’d lose my current history I was a little bit wary so declined. Unfortunately this was not a the last I heard of it. Time Machine refused to back up until I started a new back up.
Some digging
Firstly, I’m not using an Apple Time Capsule for my backups, I’ve a nice ReadyNAS Ultra for this purpose. I reached for Google and began searching. I found many articles talking about being unable to backup, find the drive and even backup errors but not many describing a fix to my problem. I did however come across a post by Garth Gillespie detailing a solution. He describes how to mount the backup and run a file system check to repair and problems.
This could save the day. But it’s never that simple is it? For me I was unable to fix the file system due to being forced to mount it read-only. I needed to find out a way to mount it read-write before I could continue.
Mounting the file system to allow writing
I must admit, once I’d figured out the magic commands the rest was easy. I followed Garths steps and it worked. I’ll detail my steps below (for my record more than anything else.)
$ sudo su -
Before you start, make sure you don’t have Time Machine enabled or any of the Time Machine drives mounted, we will do this manually.
$ mkdir /Volumes/TimeMachine
$ mount_afp afp://ReadyNAS:<pass>@<ip-address>/ReadyNAS /Volumes/TimeMachine
Now we have mounted our share we can start to access the individual Time Machine bundle. Let’s reset and dirty flags.
Sometimes the Sparse bundle folder is mark as “bad” and cannot be mounted read-write, this is solved using the following - thanks David!
$ chflags -R nouchg /Volumes/TimeMachine/<my-backup>.sparsebundle
And then we can attach it with the following.
$ hdiutil attach -nomount -readwrite -noverify -noautofsck /Volumes/TimeMachine/<my-backup>.sparsebundle
After executing the above command I got the following output. It’s the last entry we are interested in, the Apple_HFS partition.
/dev/disk2          	GUID_partition_scheme
/dev/disk2s1        	EFI
/dev/disk2s2        	Apple_HFS
Now we have access to the sparse bundle as a device we can run a file system check and correct any errors (replace with the device listed for you.)
I used to try a file system check with
fsck_hfsbut ran into many “device busy” errors. A little digging I tried thediskutilcommand which seemed to work instead.
#fsck_hfs -drfy /dev/disk2s2
$ diskutil repairVolume /dev/disk2s2
This might take a while, especially if you are doing this over WiFi. During this process, make sure your Mac does not go to sleep. Once finished all that there is left is to clean up. We have to inform Time Machine that the backup has been verified, this is by a small edit to it’s plist file. This lives inside the sparsebundle we mounted in /Volumes/TimeMachine and is called com.apple.TimeMachine.MachineID.plist. I’m going to use vi for this but you can use any editor you choose.
$ cd /Volumes/TimeMachine/<my-backup>.sparsebundle
$ vi com.apple.TimeMachine.MachineID.plist
Now, we need to remove the following two lines to hide the fact that Time Machine has already rejected the backup.
<key>RecoveryBackupDeclinedDate</key>
<date>some-data</date>
And then we change the state of the verification from failed (2), to passed (0). Change
<key>VerificationState</key>
<integer>2</integer>
to
<key>VerificationState</key>
<integer>0</integer>
Finally, issue the two following commands and we are done.
$ hdiutil detach /dev/disk2s2
$ umount /Volumes/TimeMachine
Now re-enable Time Machine and let it backup. Fingers crossed it will verify that the backup is ok and continue where it left off preserving your existing history.
Update
I’ve recently replaced my ReadyNAS with a Synology and have also had to fix the backup with this. Luckily the script still works but the share name is different time-machine. So I’ve updated the script to ask for this information and added a download link.
A little script
Thanks to Jacco Hoeve for help with some automation!
This is setup for ReadyNAS users so assumes your share is called ReadyNAS. Create a file named repair.sh and copy the below into it (or download it here)
if [[ $(whoami) != 'root' ]]; then
    exit 1
fi

read -p 'Enter Time Machine Hostname: ' HOSTNAME
read -p 'Enter Share: ' SHARE
read -p 'Enter Username: ' USERNAME
read -s -p 'Enter Password: ' PASSWORD

TM_NAME=$(hostname -s | sed -e 's/-/ /g')
MOUNT=/Volumes/TimeMachine
SPARSEBUNDLE=$MOUNT/$TM_NAME.sparsebundle
PLIST=$SPARSEBUNDLE/com.apple.TimeMachine.MachineID.plist

echo "Disabling Time Machine"
tmutil disable

echo "Mounting volume"
mkdir $MOUNT
mount_afp afp://$USERNAME:$PASSWORD@$HOSTNAME/$SHARE $MOUNT

echo "Changing file and folder flags"
chflags -R nouchg "$SPARSEBUNDLE"

echo "Attaching sparse bundle"
DISK=`hdiutil attach -nomount -readwrite -noverify -noautofsck "$SPARSEBUNDLE" | grep Apple_HFS | cut -f 1`

echo "Repairing volume"
#diskutil repairVolume $DISK
/sbin/fsck_hfs -fry $DISK

echo "Fixing Properties"
cp "$PLIST" "$PLIST.backup"
sed -e '/RecoveryBackupDeclinedDate/{N;d;}'   \
    -e '/VerificationState/{n;s/2/0/;}'       \
    "$PLIST.backup" \
    > "$PLIST"

echo "Unmounting volumes"
hdiutil detach /dev/$DISK
umount $MOUNT

echo "Enabling Time Machine"
tmutil enable

echo "Starting backup"
tmutil startbackup

exit 0